Back to (and Inside) the Hills of Medellin
This post is part of Everything to Know Before Visiting Medellin, a collection of no-B.S., unique guides to an unforgettable stay in Colombia.
While scouring the internet for hiking trails in Medellin, I stumbled upon an old Facebook event for a group hike to a place called Las Cuevas del Higueron.
Cuevas means "caves" in Spanish. Having hiked all over the hills of Medellin I was excited for this opportunity to explore their insides. (Sorry if that sounded creepily sexual.)
Was my excitement deserved?
Well, Kim and I made it to las Cuevas del Higueron last weekend and… I'd have to say the hike had its up and downs, literally and figuratively.
Quick Facts
- Duration: 3-4 hours total to go up to the Cuevas del Higueron and the waterfalls then back again
- Difficulty: Moderately easy
- Distance: Approximately 6 km / 4 miles
- Elevation: Approx 500 meters / 1600 feet gain from trailhead to waterfalls.
- What to Bring: The usual hiking gear and snacks plus an extra layer if you're going to have lunch after, since it is slightly cooler up in the hills around Parque El Salado.
Map
To not get as lost as we did, download Wikiloc and sign up for a premium account, find the most up-to-date trail (this one was recorded in May 2019), and follow it with your phone's GPS.
Getting to the Trailhead
The Cuevas del Higueron trailhead is nearby the entrance to Parque El Salado in Envigado and is very easy to get to by public transit. Just go to the Envigado metro station and take one of the frequent buses that has "El Salado" written on the front of the bus.
Even easier than public transit is taking a taxi. It only costed Kim and I 14,000 COP from El Poblado. That isn't much more expensive than the cost of a metro plus a bus, and is much faster.
From Parque El Salado, the trailhead is just up the hill and over a wooden bridge. Look for the cobblestone "camino real" and prominent sign and map. That's where the hike begins!

Cuevas del Higueron Hike Guide
1. A Clearcut Path
The beginning of the hike to las cuevas del Higueron is on an ancient camino real cobblestone road. It'll take you alongside a couple small traditional farms where you'll see horses eating from troughs right in front of the house. It's pleasant, but only lasts for about 5 to 10 minutes.
The next 5 to 10 minutes is not so pleasant.
It's a well-defined but somewhat depressing path up the clear-cut hillside. By the looks of it, people chopped down the trees not too long ago and burned the wood to sell as charcoal.
Further destroying the natural ambiance when we went was the incessant buzzing of dirt bikes ripping around the nearby Parque Aventura Escobero. Also, at one of the nearby farms a guy was blaring house music while cleaning up bottles from what appeared to have been a big rave the previous night.
Not exactly the natural getaway we were probably hoping for.
But things get better.
2. Dive into the Pines
Continuing on, the trail dives into some yet-to-be-chopped pine forest. Thankfully the sound of the dirt bikes becomes increasingly muffled.
It's a well-defined path that's in pretty good shape. The only problem is the trail is heavily used by local farmers, so it has multiple confusing offshoots that Kim and I got lost on. Twice.
To avoid getting lost yourselves, use the "Road Intercept" waypoint on the above map as a guide and keep an eye out for yellow-orangish trail markers painted onto various rocks and roots. If you hike for a few minutes without seeing any of these markers, that's a good sign you should backtrack.

3. Up A Short Road (and a View)
The narrow forest trail ends when you hit a wider gravel road (the "Road Intercept" point on the map). Follow this road uphill until you get to a three-way fork.
One of the three paths is fenced-off with a sign saying "Prohibido el Paso a Particulares" (no trespassing). Counterintuitively, that's the one you need to take to get to las Cuevas del Higueron.
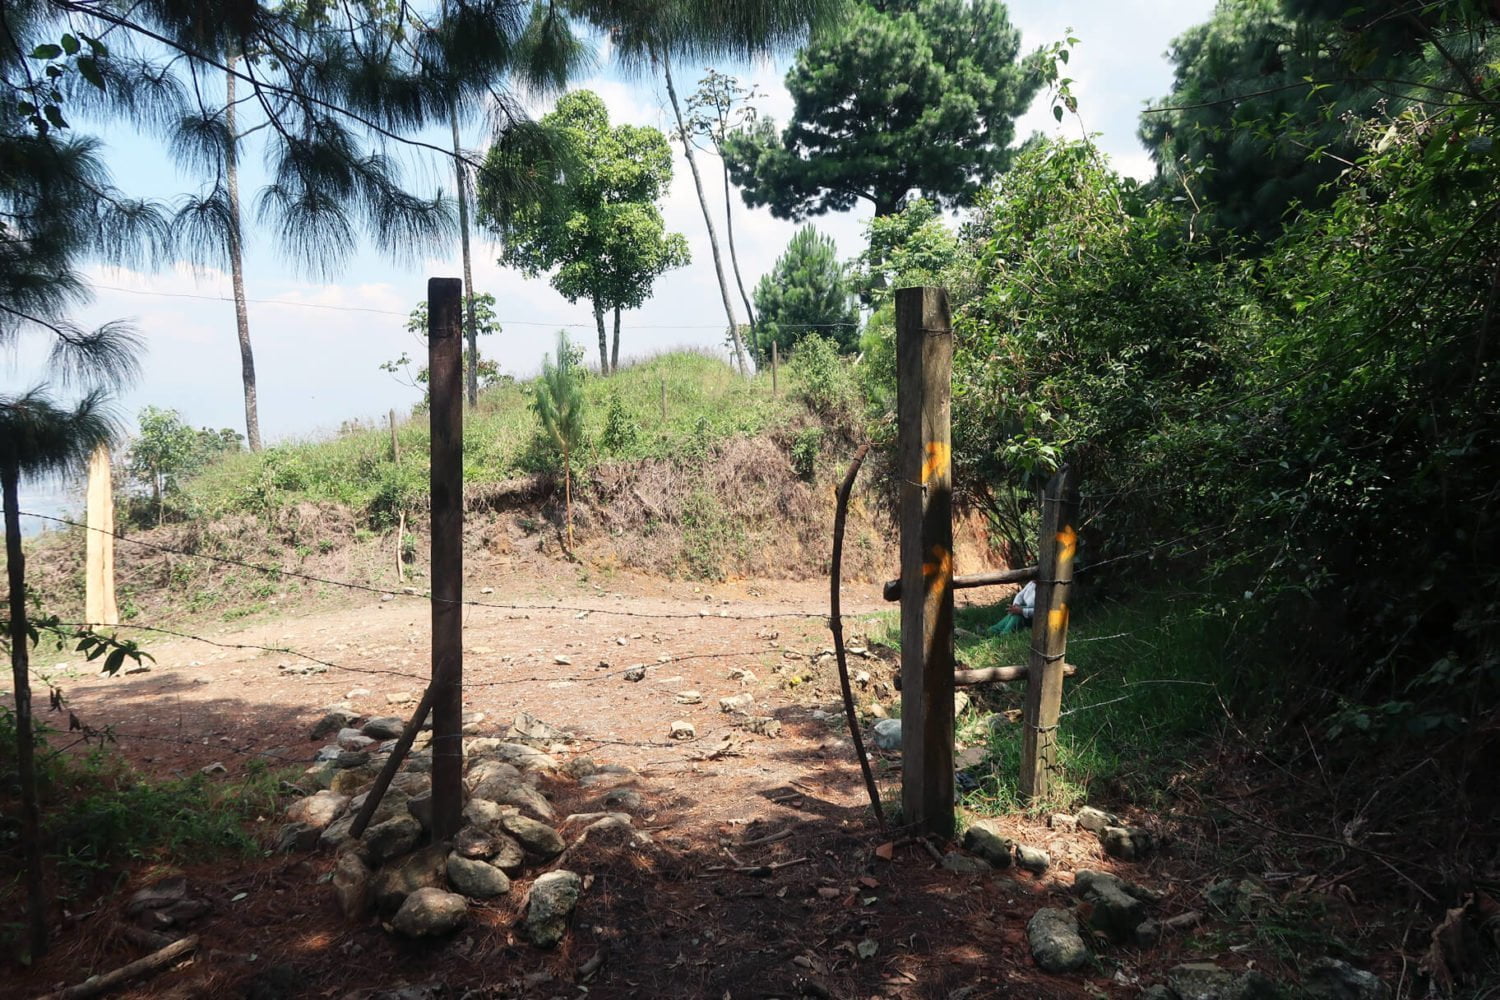
But before "trespassing" towards the caves you might want to do a quick detour to get a nice view of Envigado, Medellin, and the whole Aburra Valley. You can do so by continuing up the main road (the middle one in the fork) for a few minutes. The whole city will open up to you on the right-hand side.

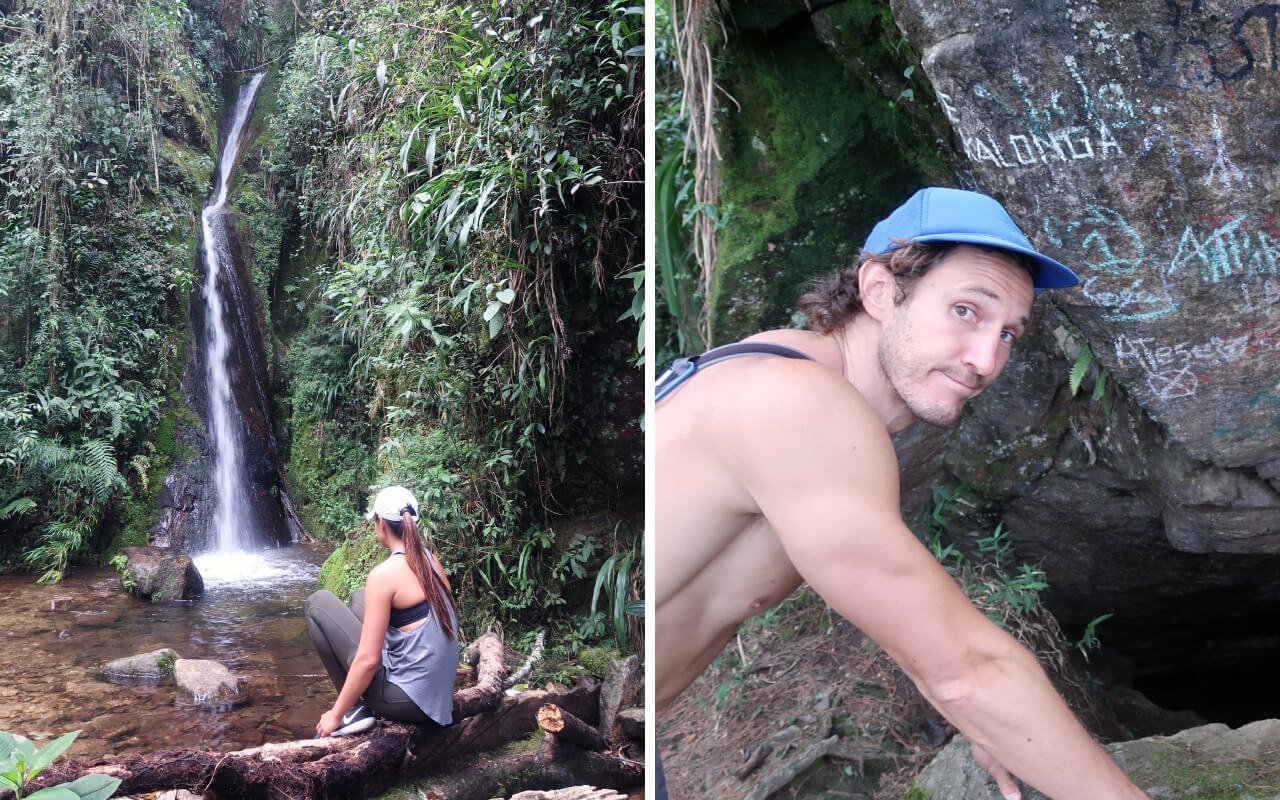
4. On to the "Caves"
After going through fence, the path to the las Cuevas del Higueron is so easy to follow that even Kim and I couldn't get lost on it.
Unfortuately, the caves themselves would have been impossible to get lost in too.
First of all, las Cuevas del Higueron are not "caves." It's one single cave. Secondly, it's not even really a cave. It's a big graffiti-covered rock that has some space below it you can walk under.
The "caves" were so underwhelming that Kim and I thought the actual caves must be further along and didn't bother stopping on the way up.

5. An Actual Waterfall
Continuing past the "caves" on the same trail, you'll begin to hear a stream and then a waterfall. What you're hearing are Las Cascadas del Higueron. These waterfalls are a short detour off the right of the trail while going up.
While not quite as beautiful as the Chorro de la Campana in nearby Arenales, the waterfalls are a worthy spot to rest your legs and get refreshed.

6. Getting Thrown for (Not a) Loop
Those who still have energy and who prefer not to come back the way they came can apparently continue uphill beyond the waterfalls until reaching a different trail that will loop back to the trailhead.
We had read about this way to make the hike a loop on Wikiloc, but Kim and I couldn't find it. And since we'd taken multiple unplanned detours on the way up, we didn't have the energy for more exploring. We walked back the same way we came.
We learned our lesson. After the hike "splurged" by paying $2.99 for a 3-month trial of Wikiloc, an app that many local hikers here in Medellin use to map out their hikes and follow where others went using your phone's GPS. If you're planning on hiking in Medellin I suggest you get Wikiloc too.

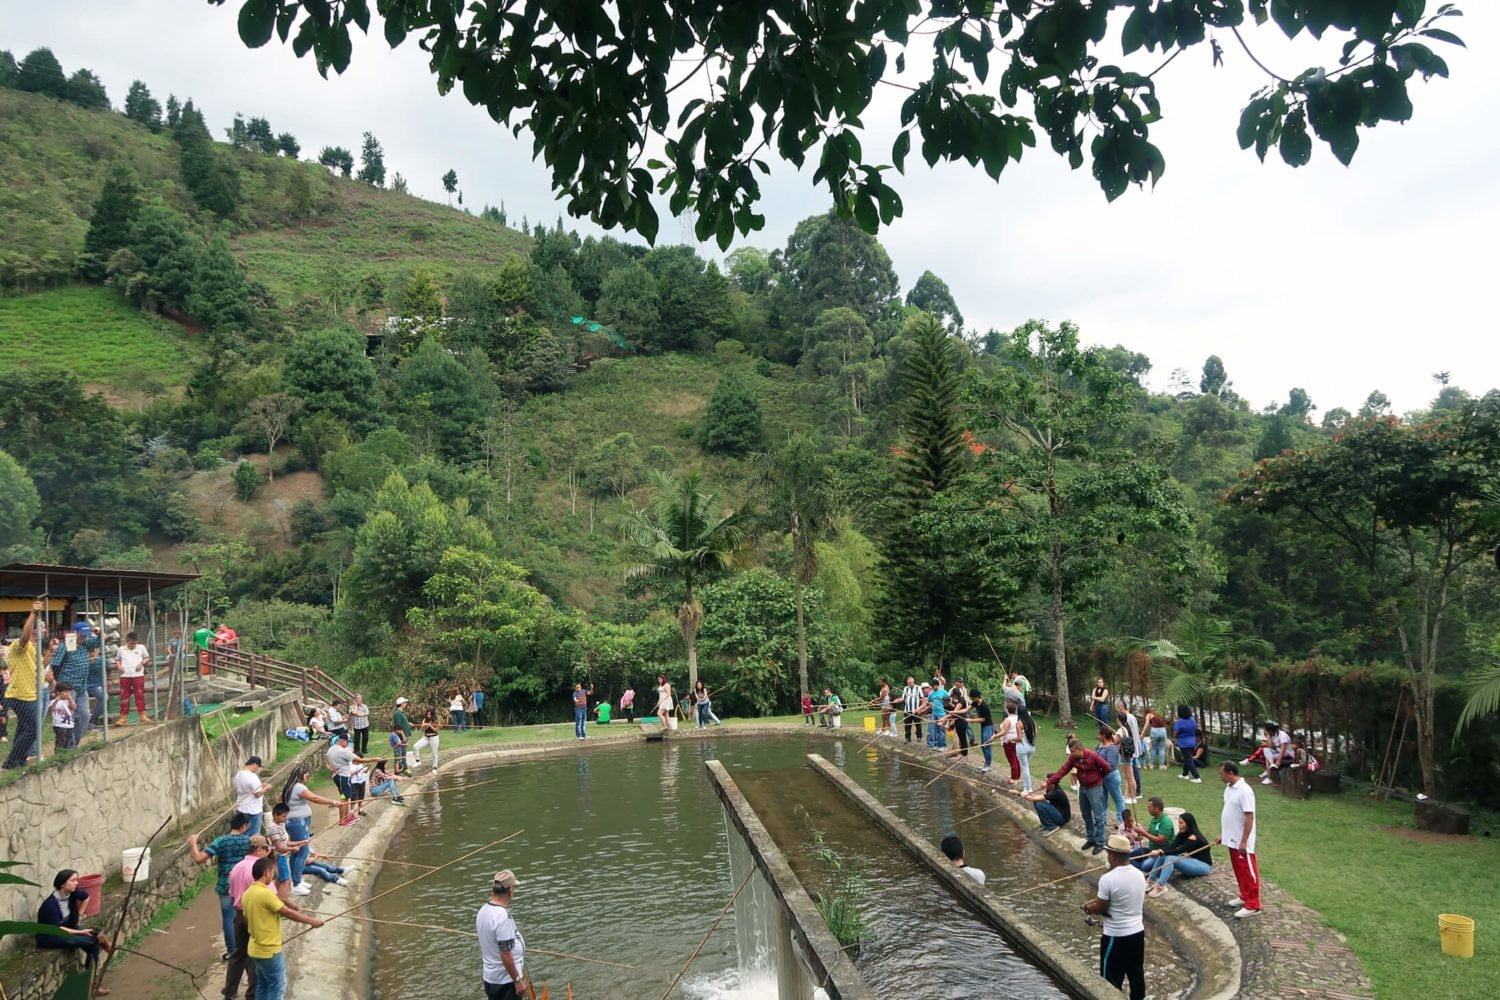
7. A Traditional Post-Hike Meal
Following our hike to the Cuevas del Higueron, Kim and I enjoyed a late lunch at Truchera Arco Iris, a trout farm and restaurant just a couple hundred meters downhill from the trailhead.
It was a Sunday afternoon and it was happening! At the fishing pond, dozens of people were trying to catch their lunch and every table at the restaurant was full with hungry Paisas.
Kim and I both had the trout, some coconut rice on the side, and a couple of fresh fruit smoothies. While the food wasn't particularly amazing, eating at Truchera Arco Iris was a fun cultural experience and quite affordable, costing 46,000COP all in.
More Medellin
For more hikes, many of which are easily accessible by public transport, check out our ever-expanding list of Medellín hikes we covered.
For all the ingredients you need to put together a magnificent Medellin trip—where to stay, what to do, what to eat, where else to visit in Colombia—see our Medellin Travel Manual.
And if you have any questions, comments, or suggestions to share with other readers, please share them in the comments!
You guys might want to update this walk. I did this walk this morning and based on my experience and talking to locals, the area has changed quite a bit.
First of all, after 10 minutes or so of walking along the cobblestone path at the very beginning of the hike, you reach a 3-way junction. To the left and right there are signs that say "prohibido – propriedad privada" so the only way up is straight ahead. Turns out that path is not the one that gets you to your road intercept but one that runs parallel to it and goes on and on and on up the mountain. We had gone quite a bit further south than the waterfall and had to cut through the forest (I would not recommend doing) to get back to the path that eventually lead back north to the waterfall. Thank goodness GPS was working on my phone.
From there we followed the trail that's on google maps back to the road intercept. Took the road intercept junction and followed the path (we did see a couple of those orange markers) and got back to the first junction I mentioned but it was the junction on the left. We had to pass through barbed wire (as we were on the wrong side of a No Entry gate). A local explained to us that when they chopped down the forest as you said, loads of tourists were coming in trampling down on new trees that had been planted, leaving garbage everywhere – so they closed up the road that your guide indicates you need to take to get to the road intercept. So we only got back the right way by going through what is now private property.
The path we took at the beginning might be connected to the loop you describe that goes beyond the waterfall, but we had no idea where or when it would connect… it just kept going on forever until we decided to cut through the forest and rejoin the main trail.
Hi Cameron, Thanks for updating us on this. And sorry to hear you had a tough time finding your way.
These guys (click here) did the trail not too long ago, in May 2019. Are you sure it's changed since then, or it it possible you got turned around like we did?
Either way, the Google Maps waypoints we included obviously hindered instead of helped you. I'm sorry about that. We've taken that map off this post and replaced it with a strong recommendation to download and use Wikiloc, following the most up-to-date trail.